Tactile polyurethane tiles. Types of tiles and recommendations for laying tactile strips.
Tactile polyurethane tiles. Types of tiles and recommendations for laying tactile strips.
When arranging a space for visually impaired people, a prerequisite is the installation of tactile landmarks on the floor of the room, such as tactile polyurethane tiles or other tactile accessibility elements.
According to DBN B.2.2-40:2018 Inclusivity of buildings and structures, tactile tiles (or tactile strips) are a means of guiding people with visual impairments, in particular, those who use a white cane. Their proper installation makes public spaces safe, informative and comfortable for everyone.
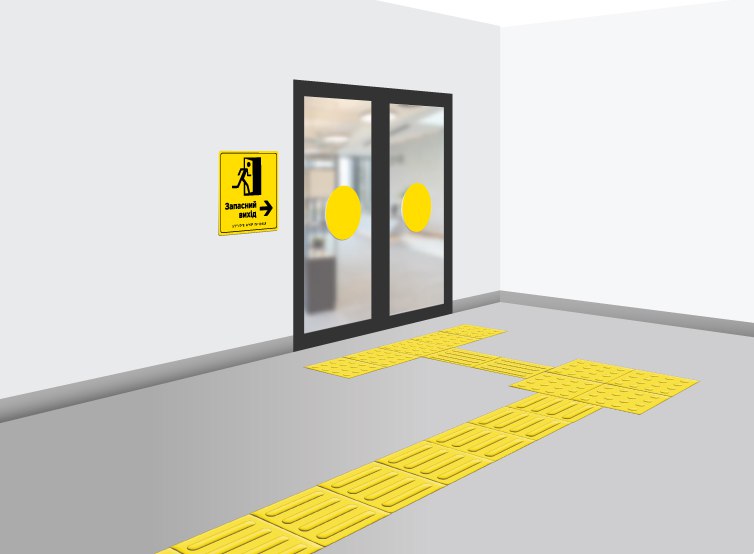
Two types of tiles are used in the interior: guide polyurethane tiles and warning polyurethane tiles. They should differ in colour and texture from the surface on which they are installed. In addition, there are functional differences in the texture of tactile tiles.
Warning tiles are used to warn of a barrier, obstacle or danger. They are made of durable materials, have a rough surface, and increased wear resistance to intense mechanical stress. On our website, you can view and order tactile tiles based on 3M double-sided tape, as well as without an adhesive base.
The second type of tactile tile is a guide. These tiles have longitudinal stripes that, when installed correctly, show the direction of movement.
Tactile strips help to navigate in space, follow a route, find the entrance to a building, a public transport stop, etc.
All tactile tiles should be securely fixed to the floor, not ‘bulging’ at the edges and replaced in time in case of damage.
You can also purchase this type of tile on our website for self-installation
The main recommendations for laying tactile warning tiles.
According to DBN B.2.2-40:2018 Inclusiveness of buildings and structures, warning tiles should be installed to warn of a danger or obstacle.
Special warning tactile tiles should be 0.3 - 0.6 m wide and should be installed along the entire width of the obstacle or along the entire width of the subsequent path of movement.
Tiles of this type must be laid parallel to the obstacle, before the start of stairs, ramps, before the general entrance or exit.
Basic requirements for installing tactile guide tiles:
- the minimum length of the tactile tile strip when the tiles are joined to each other should be at least 1.2 m. After all, a white cane often averages 1.0 to 1.1 m, although many people use canes with a length of 1.2 m or more. You also need to take into account the length of one person's step.
- if tactile warning tiles are laid parallel to each other, the distance between them should be at least 3.0 m for the same reason;
- the optimal width of the special tactile warning tile is 0.3 m;
- the beginning of the special warning tactile strip should be located at least 0.2 m and not more than 0.5 m before the obstacle;
Information tiles that indicate changes in direction or divergences in different directions of the guide tile should be at least 0.6 × 0.6 m in size. The optimal size for identification is 0.9 × 0.9 m, and this size can be increased.
+Follow the national standards (DSTU ISO 23599:2017. Products to assist the blind and visually impaired. Tactile pedestrian zone indicators (ISO 23599:2012, IDT))
- These standards define clear requirements for the size, shape, material, and location of tactile stripes.
- Use stripes with a clear relief that are easily recognisable by touch.
ØIncorrect location:
- Stripes may be too close to obstacles, making them difficult to recognise.
- Incorrect spacing between stripes makes them unclear
- Tactile overload should be avoided, which in turn leads to difficulty in spatial orientation for a blind person.
ØPoor quality material:
- The use of slippery or fragile material makes the strips unsafe.
- A coating that is not weatherproof will wear out quickly and lose its properties.


